
Introduction Xenn.io
Welcome to the Xenn.io documentation! You can use our SDKs for collecting your events, handling push notifications and load contents for recommendations. We have SDKs for IOS, Google Store Android, Huawei Store Android and Web Applications!
Applications
Xenn.io provides IOS, Android and JavaScript SDK's for collecting application event data. The following guide will describe you how to integrate your application using related SDK.
Creating Application
For resolving SDK code blocks, from xenn.io management console, you need to complete application setup from applications.
For creating application navigate from menu Setup -> Application or
click here
Click Create New Application button or click here

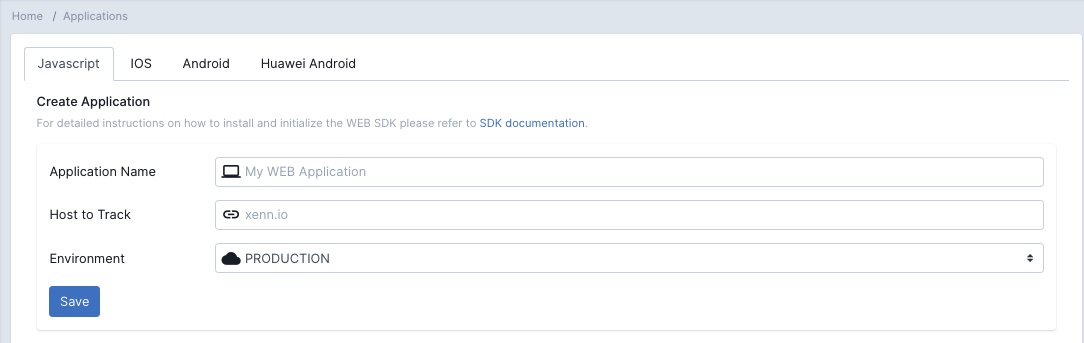
Application setup page will appear. Select your application type, fill form and click save to create your application.
JavaScript Client
| Parameter | Optional | Description |
|---|---|---|
| Application Name | false | Friendly name of your application (Customer Web Site) |
| Host To Track | false | JavaScript client makes OPTION type request for handling events. Host should be present without HTTP/HTTPS |
| Environment | false | Identifies your application running environment |
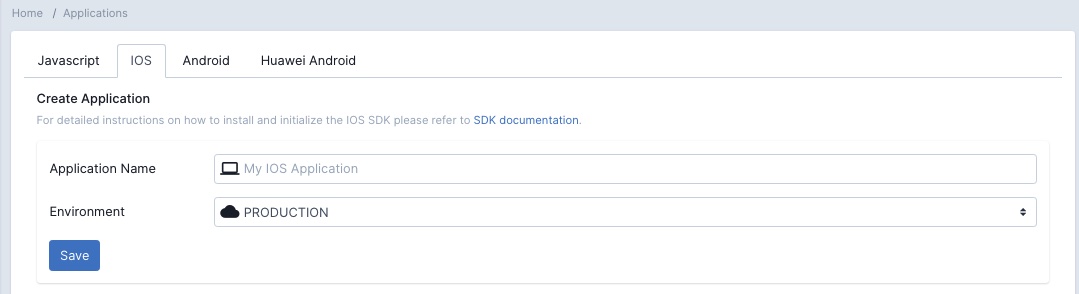
IOS Client
| Parameter | Optional | Description |
|---|---|---|
| Application Name | false | Friendly name of your application (IOS Aplication) |
| Environment | false | Identifies your application running environment |
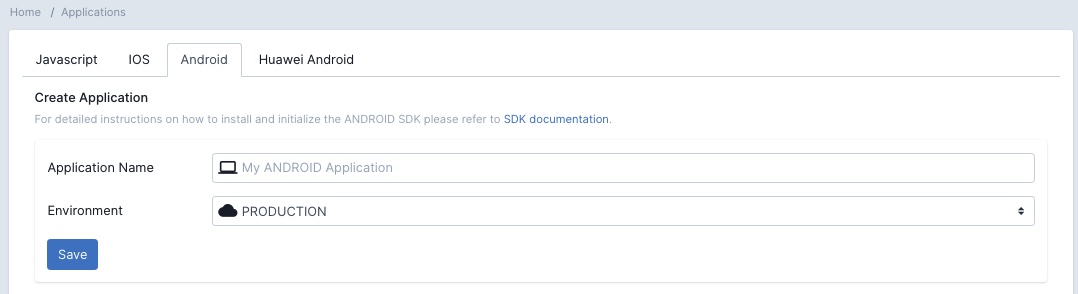
Android FCM Client
| Parameter | Optional | Description |
|---|---|---|
| Application Name | false | Friendly name of your application (Google Store Android Application) |
| Environment | false | Identifies your application running environment |
Android Huawei Client

| Parameter | Optional | Description |
|---|---|---|
| Application Name | false | Friendly name of your application (Huawei Store Android Application) |
| Environment | false | Identifies your application running environment |
iOS SDK Setup
Integration of Xenn.io SDK to your iOS native app with Swift or Objective-C
![]()


Step 1 - Requirements
- Xenn.io account if you do not already have one
- Your Xenn.io App ID, available in Setup > Applications in the Xenn.io console
Step 2 - Installing the Xenn.io SDK
Setup with Cocoa Pods
- Add the Xenn.io dependency to project's
Podfilelike below
target 'your-ios-application' do
 pod 'Xennio', '~> 2.5.8'
end
- Run the following commands in terminal in your project folder
pod repo update
pod install
Step 3 - Configuring of iOS SDK
Open AppDelegate file and add the Xenn.io configuration codes with your credentials to didFinishLaunchingWithOptions method.
func application(_ application: UIApplication, didFinishLaunchingWithOptions launchOptions:
 [UIApplication.LaunchOptionsKey: Any]?) -> Bool {
 let xennConfig = XennConfig.create(sdkKey: "YOUR-SDK-KEY")
 Xennio.configure(xennConfig: xennConfig)
 return true
}
- Replace
YOUR-SDK-KEYwith your Application SDK Key
Now IOS SDK Setup installation completed you can navigate from here documentation for event collecting
Google Android SDK Setup
Integration of Xenn.io SDK to your Android native app with Java or Kotlin
![]()

![]()
Step 1 - Requirements
- Xenn.io account if you do not already have one
- Your Xenn.io App ID, available in Setup > Applications in the Xenn.io console
Step 2 - Installing the Xenn.io SDK
Dependency Repository Config
- In app module's build.gradle file, add dependency statement inside of dependencies block
dependencies {
 implementation group: 'io.xenn', name: 'android-sdk', version: '3.1.5'
 implementation group: 'io.xenn',name: 'fcm-kit', version: '1.0.2'
}
Check latest version of SDK from here
- Refresh your dependencies from Android Studio
Step 3 - Configuring of Google Android SDK
Open your project's Application file and add the Xenn.io configuration codes with your credentials to onCreate method.
@Override
public void onCreate() {
  super.onCreate();
  XennConfig xennConfig = XennConfig.init("YOUR_SDK_KEY").useXennPlugin(FcmKitPlugin.class);
  Xennio.configure(this, xennConfig);
}
- Replace
YOUR-SDK-KEYwith your Application SDK Key
Now IOS SDK Setup installation completed you can navigate from here documentation for event collecting
Session Parameters
Xenn.io SDK is managing session automatically. To create more deep analysis before firing events you have to consider completing session setup.
Identifying your members
You can correlate your logged-in session activities with using SDK login method. You can call this method anytime after configuring Xenn.io. If this method called before any eventing activities, memberId will be inserted session variables. If this method called after any eventing activities new session will start and all events will be correlated with new session.
iOS SDK
Xennio.login(memberId: "YOUR_MEMBER_ID")
Android SDK
Xennio.login("YOUR_MEMBER_ID");
Removing member from session
In case of removing association between session and member you can simply call SDK logout method. If this method called after any eventing activities new session will start and all events will be correlated with new session.
iOS SDK
Xennio.logout()
Android SDK
Xennio.logout();
Correlating external application parameters with session
Most of the applications would like to track their external traffic sources. For tracking external traffic sources, Xenn.io SDK provides method to synchronize parameters like utm_source, utm_campaign_ utm_medium, utm_term, utm_content and gclid(Google Ad Id).
iOS SDK
Open AppDelegate file and add lines to application open url method.
func application(_ application: UIApplication, open url: URL,
                     options: [UIApplication.OpenURLOptionsKey : Any] = [:]) -> Bool {
 // An extension method can be used for mapping all url query string parameters to Dictionary
 let externalParameters = url.queryDictionary
 if(externalParameters != nil) {
   Xennio.synchronizeWith(externalParameters: externalParameters!)
 }
 return true
}
Android SDK
In MainActivity add lines to onNewIntent method
@Override
protected void onNewIntent(Intent intent) {
  super.onNewIntent(intent);
  Map<String,Object> extraParameters = new HashMap<>();
  Bundle bundle = intent.getExtras();
  if (bundle != null) {
    for (String key : bundle.keySet()) {
      extraParameters.put(key, bundle.get(key));
    }
  }
Xennio.synchronizeIntentData(extraParameters);
}
Events
Xenn.io SDK provides both structured event collection and custom event collection methods The following guide will describe you how to create event with SDK.
Page Views
Page view events should be fired whenever a page rendered. You should set pageType in method parameters. You can add extra parameters to your page view events.
iOS SDK
Xennio.eventing().pageView(pageType: "homePage")
// Page view events with extra parameters
Xennio.eventing().pageView(pageType: "homePage", params: ["url": "https://xenn.io/detail",
"id": "12312", "hasAccess": false])
Android SDK
Xennio.eventing().pageView("homePage");
// Page view events with extra parameters
Map<String, Object> params = new HashMap<>();
params.put("url", "https://xenn.io/detail");
params.put("id", "12312");
params.put("hasAccess", true);
Xennio.eventing().pageView("homePage", params);
Action Results
Action results should be fired whenever a visitor takes action like submit a form, change sorting direction, adding item to cart. You should set type of action in method parameters. You can add extra parameters to your action result events.
iOS SDK
Xennio.eventing().actionResult(type: "testAction")
// Page view events with extra parameters
Xennio.eventing().actionResult(type: "homePage", params: ["url": "https://xenn.io/detail",
"id": "12312", "hasAccess": false])
Android SDK
Xennio.eventing().actionResult("testAction");
// Page view events with extra parameters
Map<String, Object> params = new HashMap<>();
params.put("url", "https://xenn.io/detail");
params.put("id", "12312");
params.put("hasAccess", true);
Xennio.eventing().actionResult("testAction", params);
Impressions
Impression should be fired whenever application displays banner, product, listing etc. You should set type of action in method parameters. You can add extra parameters to your impression events.
iOS SDK
Xennio.eventing().impression(type: "bannerView")
// Page view events with extra parameters
Xennio.eventing().impression(type: "bannerView", params: ["entity": "banners",
"id": "12312", "hasAccess": false])
Android SDK
Xennio.eventing().impression("bannerView");
// Page view events with extra parameters
Map<String, Object> params = new HashMap<>();
params.put("entity", "banners");
params.put("id", "12312");
params.put("hasAccess", true);
Xennio.eventing().impression("bannerView", params);
Custom Events
Custom events can also stored in Xenn.io. You cannot use in segmentation or queries but it will be stored like other events. You should set name of custom event in method parameters. You can add extra parameters to your custom events.
iOS SDK
Xennio.eventing().custom(eventName: "Click")
// Page view events with extra parameters
Xennio.eventing().custom(eventName: "Click", params: ["buttonName": "Add To Cart", "origin": "productDetail"])
Android SDK
Xennio.eventing().custom("Click");
// Page view events with extra parameters
Map<String, Object> params = new HashMap<>();
params.put("buttonName", "Add To Cart");
params.put("origin", "productDetail");
Xennio.eventing().custom("Click", params);
E-commerce Events
Xenn.io SDK provides structured e-commerce events for easy tracking without missing data. This method set will same api with predefined method and properties.
Product Views
Method should be called whenever customer opens a product detail page. Check the data structure for feeding relevant fields and data.
| Parameter | Type | Optional | Description |
|---|---|---|---|
| productId | String | false | Identifier of product |
| variant | String | true | Identifier of a variant if selected or present |
| price | Double | false | Full price of product |
| discountedPrice | Double | true | Discounted price of product |
| currency | String | false | ISO currency code of product |
| supplierId | String | true | If product supplied by multiple vendor add supplier id |
| path | String | true | Url path of product detail page |
iOS SDK
Xennio.ecommerce().productView(productId: "1231", variantId: nil, price: 28.2, discountedPrice: nil,
currency: "USD", supplierId: nil, path: "http://xenn.io/productpath")
Android SDK
Xennio.ecommerce().productView("1003", "small", 200d, 180d, "USD", null,
"https://commercedemo.xenn.io/proteus-fitness-jackshirt.html");
Category Views
Method should be called whenever customer opens a category page. Check the data structure for feeding relevant fields and data.
| Parameter | Type | Optional | Description |
|---|---|---|---|
| categoryId | String | false | Identifier of category |
| path | String | true | Url path of category detail page |
iOS SDK
Xennio.ecommerce().categoryView(categoryId: "123123", path: nil)
Android SDK
Xennio.ecommerce().categoryView("123123", "http://path");
Search Result
Method should be called whenever customer makes free text search. Check the data structure for feeding relevant fields and data.
| Parameter | Type | Optional | Description |
|---|---|---|---|
| keyword | String | false | Search keyword |
| resultCount | Integer | false | Items count of search result |
| path | String | true | Url path of search page |
iOS SDK
Xennio.ecommerce().searchResult(keyword: "green shirt", resultCount: 254)
Android SDK
Xennio.ecommerce().searchResult("green shirt", 129, null);
Add To Cart
Method should be called whenever customer adds item to basket. Check the data structure for feeding relevant fields and data.
| Parameter | Type | Optional | Description |
|---|---|---|---|
| productId | String | false | Identifier of product |
| variant | String | true | Identifier of a variant if selected or present |
| quantity | Integer | false | Quantity added to basket |
| price | Double | false | Full price of product |
| discountedPrice | Double | true | Discounted price of product |
| currency | String | false | ISO currency code of product |
| origin | String | true | Location of add to basket button. Eg: ProductDetail, CategoryDetail |
| basketId | String | true | Unique identifier of basketId |
| supplierId | String | true | If product supplied by multiple vendor add supplier id |
iOS SDK
Xennio.ecommerce().addToCart(productId: "product1", variant: nil, quantity: 27, price: 28.9,
discountedPrice: nil, currency: "USD", origin: "ProductDetailPage", basketId: "basket232", supplierId: nil)
Android SDK
Xennio.ecommerce().addToCart("productId", null, 27, 29.8, null,"USD", "ProductDetailPage", "basket1231", null);
Remove From Cart
Method should be called whenever customer removes item from basket. Check the data structure for feeding relevant fields and data.
| Parameter | Type | Optional | Description |
|---|---|---|---|
| productId | String | false | Identifier of product |
| variant | String | true | Identifier of a variant if selected or present |
| quantity | Integer | false | Quantity added to basket |
| basketId | String | true | Unique identifier of basketId |
iOS SDK
Xennio.ecommerce().removeFromCart(productId: "productId", variantId: nil, quantity: 1, basketId: "basketId")
Android SDK
Xennio.ecommerce().removeFromCart("productId", null, 10, "basketId");
Cart View
Method should be called whenever customer opens cart page. Check the data structure for feeding relevant fields and data.
| Parameter | Type | Optional | Description |
|---|---|---|---|
| basketId | String | false | Unique identifier of basketId |
iOS SDK
Xennio.ecommerce().cartView(basketId: "basketId")
Android SDK
Xennio.ecommerce().cartView("basketId");
Order Funnel
Method should be called if you have multiple steps before completing and Order like address input, payment information pages. Check the data structure for feeding relevant fields and data.
| Parameter | Type | Optional | Description |
|---|---|---|---|
| basketId | String | false | Unique identifier of basketId |
| step | String | false | Name of step. Eg: AddressInfoPage, CreditCardPage |
iOS SDK
Xennio.ecommerce().orderFunnel(basketId: "basketId", step: "AddressInfoPage")
Android SDK
Xennio.ecommerce().orderFunnel("basketId", "AddressInfoPage");
Order
Method should be called after if your customer completed a successful order. SDK provides builders to create an Order.
- Order Item Structure
| Parameter | Type | Optional | Description |
|---|---|---|---|
| productId | String | false | Identifier of product |
| variant | String | true | Identifier of a variant if selected or present |
| quantity | Integer | false | Quantity added to basket |
| price | Double | false | Full price of product |
| discountedPrice | Double | true | Discounted price of product |
| currency | String | false | ISO currency code of product |
| supplierId | String | true | If product supplied by multiple vendor add supplier id |
- Order Structure
| Parameter | Type | Optional | Description |
|---|---|---|---|
| basketId | String | false | Unique identifier of basketId |
| orderId | String | false | Unique identifier of orderId |
| totalAmount | Double | false | Total Price of order |
| discountAmount | Double | false | Total Discount Amount of order |
| paymentMethod | String | false | Payment method of order. CreditCard, Cash, etc |
| coupon | String | true | If present, coupon code of order |
| discount | String | true | If present, discount name of order |
| promotion | String | true | If present, promotion name of order |
let order = Order.create(orderId: "orderId")
  .addItem(productId: "product1", variantId: nil, quantity: 2, price: 20.0, discountedPrice: 15.0, currency: "USD", supplierId: nil)
  .addItem(productId: "product2", variantId: nil, quantity: 2, price: 20.0, discountedPrice: 15.0, currency: "USD", supplierId: nil)
  .totalAmount(totalAmount: 55)
  .discountedAmount(discountedAmount: 35)
  .withCoupon(couponName: "AppliedCouponCode")
  .withDiscount(discountName: "Extra Discount Product 1")
  .withPromotion(promotionName: "BuyOneGetTwo")

Xennio.ecommerce().orderSuccess(basketId: "basketId", order: order)
Order order = Order.create("orderId")
  .addItem("product1", "variantId", 2, 20.0, 15.0, "USD", "supplierId")
  .addItem("product2", "variantId", 2, 20.0, 15.0, "USD", "supplierId")
  .totalAmount(55.0)
  .discountAmount(34.0)
  .paidWith("CreditCard")
  .withCoupon("AppliedCouponCode")
  .withDiscount("Extra Discount Product 1")
  .withPromotion("BuyOneGetTwo");

Xennio.ecommerce().orderSuccess("basketId", order);
iOS Push Notifications
Step 1 - Apple Requirements
- Because of Xcode simulator doesn't have push notification support for testing purposes, you need an real iOS test device.
- Apple Push Notification service SSL certificate.
Step 2 - Adding a Notification Service Extension
The iOS notification service extension allows your iOS application to receive rich notifications. It's also required for Xenn.io's analytical and segmentation features.
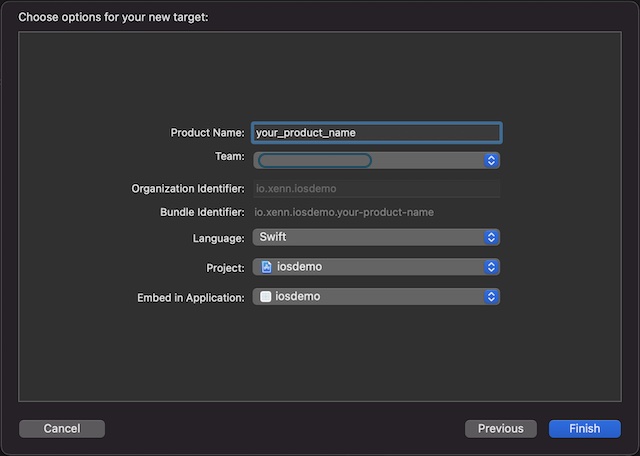
- In Xcode Select File > New > Target...
- Select Notification Service Extension then press Next

- Enter your project name, organisational identifier, language and project then press finish
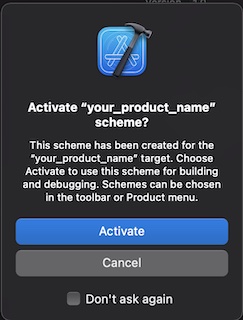
- Press Activate button
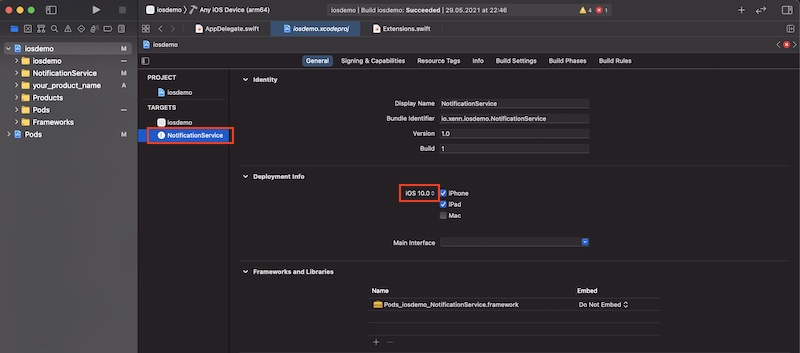
- Open project navigator, select the project directory and select the your extension which you created and targeted in the project and targets list. You have to set the Deployment Target to be iOS 10 which Apple had begun to support Rich Media for push. iOS SDK has no official suppoart for versions under 10.
- Open notification extension service file to handle incoming push notification.
import UserNotifications
import Xennio

class NotificationService: UNNotificationServiceExtension {

 var contentHandler: ((UNNotificationContent) -> Void)?
 var bestAttemptContent: UNMutableNotificationContent?

 override func didReceive(_ request: UNNotificationRequest, withContentHandler
    contentHandler: @escaping (UNNotificationContent) -> Void) {
  self.contentHandler = contentHandler
  bestAttemptContent = (request.content.mutableCopy() as? UNMutableNotificationContent)
  if (Xennio.notifications().isXennioNotification(request: request)){
   if let bestAttemptContent = bestAttemptContent {
    Xennio.notifications().handlePushNotification(request: request, bestAttemptContent: bestAttemptContent,
        withContentHandler: contentHandler)
    }
   }
}
}
}
Step 3 - iOS Application setup
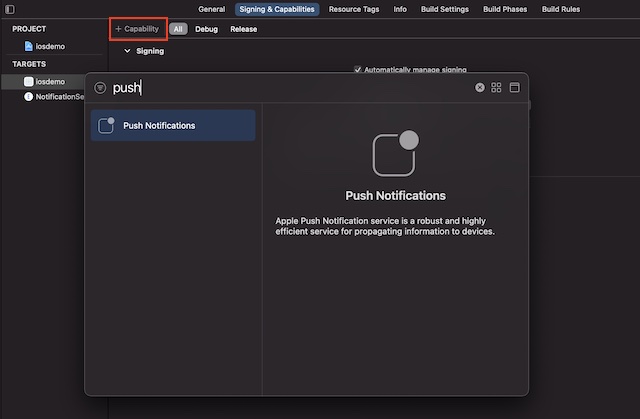
- Open project navigator again and click your application in targets. Click +Capability button and search for Push Notifications and double click Push Notifications.
- To store your users push notification tokens. Open Appdelegate file and add codes below to didRegisterForRemoteNotificationsWithDeviceToken method.
func application(_ application: UIApplication, didRegisterForRemoteNotificationsWithDeviceToken deviceToken: Data) {
    let tokenComponents = deviceToken.map { data in String(format: "%02.2hhx", data) }
    let deviceTokenString = tokenComponents.joined()
    Xennio.savePushToken(deviceToken: deviceTokenString)
}
If you already collecting push notification tokens just call
Xennio.savePushToken(deviceToken: token)For more accurate push deliverability results, handling deeplink or universal links and associate parameters with session add lines below to didReceiveRemoteNotification method
func application(_ application: UIApplication, didReceiveRemoteNotification userInfo: [AnyHashable: Any]) {
    if let pushSource = userInfo["source"] as? String {
         if "xennio" == pushSource as? String {
             Xennio.notifications().pushMessageOpened(pushContent: userInfo)

             if let launch_url = userInfo["launch_url"] as? String {
                 // Handle universal or deeplink  here
             }
             // Handle extra parameters here
         }
    }

}
- Now iOS push notification setup completed in your app. You have to create distribution for testing end to end integration.
Google Android Push Notifications
Step 1 - Firebase Requirements
- Before sending push notifications you have to create private key from Google Firebase console.
Step 2 - Extending and Registering FirebaseMessagingService
- Make sure your dependencies contains Xennio Firebase Push kit
dependencies {
 implementation group: 'io.xenn', name: 'android-sdk', version: '3.1.5'
 implementation group: 'io.xenn',name: 'fcm-kit', version: '1.0.2'
}
- Add new class which is extending FirebaseMessagingService. If you have already skip this step.
public class MyFirebaseMessagingService extends FirebaseMessagingService {
}
- Register as service to your application's manifest file like below.
<service android:name="MyFirebaseMessagingService" android:exported="false">
 <intent-filter>
   <action android:name="com.google.firebase.MESSAGING_EVENT" />
 </intent-filter>
</service>
Step 3 - Google Android Application setup
- To store your users push notification tokens add lines below to your class which extends FirebaseMessagingService
@Override
public void onNewToken(String s) {
  super.onNewToken(s);
  Xennio.plugins().get(FcmKitPlugin.class).savePushToken(s);
}
- For handling incoming push notifications add lines below to your class which extends FirebaseMessagingService
@Override
public void onMessageReceived(RemoteMessage remoteMessage) {
 super.onMessageReceived(remoteMessage);
 FcmKitPlugin fcmKitPlugin = Xennio.plugins().get(FcmKitPlugin.class);
 if (fcmKitPlugin.isXennioNotification(remoteMessage)) {
    fcmKitPlugin.handlePushNotification(this, remoteMessage);
 }
}
- Now Google Android push notification setup completed in your app. You can test your implementation without creating distribution.
Huawei Android Push Notifications
Step 1 - Huawei Messaging Service Requirements
- Before sending push notifications you have to resolve your HMS App Id and HMS Client Secret from Huawei's AppGallery Connect.
Step 2 - Extending and Registering HmsMessageService
- Make sure your dependencies contains Xennio Huawei Messaging Service Push kit
dependencies {
 implementation group: 'io.xenn', name: 'android-sdk', version: '3.1.5'
 implementation group: 'io.xenn',name: 'hms-kit', version: '1.0.2'
}
- Add new class which is extending HmsMessageService. If you have already skip this step.
public class MyHmsMessagingService extends HmsMessageService {
}
- Register as service to your application's manifest file like below.
<service android:name="MyHmsMessagingService" android:exported="false">
 <intent-filter>
   <action android:name="com.huawei.push.action.MESSAGING_EVENT" />
 </intent-filter>
</service>
Step 3 - Huawei Android Application setup
- To store your users push notification tokens add lines below to your class which extends HmsMessageService
@Override
public void onNewToken(String s) {
  super.onNewToken(s);
  Xennio.plugins().get(HmsKitPlugin.class).savePushToken(s);
}
- For handling incoming push notifications add lines below to your class which extends HmsMessageService
@Override
public void onMessageReceived(RemoteMessage remoteMessage) {
 super.onMessageReceived(remoteMessage);
 HmsKitPlugin hmsKitPlugin = Xennio.plugins().get(HmsKitPlugin.class);
 if(hmsKitPlugin.isXennioNotification(remoteMessage)){
   hmsKitPlugin.handlePushNotification(this, remoteMessage);
 }
}
- Now Huawei Android push notification setup completed in your app. You can test your implementation without creating distribution.
Notification Center
Notification Center is a great feature for native mobile apps that lets customers see push notifications they missed or never saw.
Loading notifications from IOS SDK
      var pushNotifications: Array<Dictionary<String, String>>?
      Xennio.pushMessagesHistory().getPushMessagesHistory(size: 10), callback: { (result) in
          pushNotifications = result
      })
Loading notifications from Android SDK
    Xennio.pushMessagesHistory().getPushMessagesHistory(10, new ResultConsumer<List<Map<String, String>>>() {
        @Override
        public void consume(List<Map<String, String>> data) {
            XennioLogger.log("PushMessagesHistory data is here! : " + data);
        }
    });
Transactional Push API
In order to send push notifications to members you can use transactional push api. This api will be useful if you would like to notify your members about updates their specific contexts like 'Shipment status changes', 'Order status changes' etc...
Before sending a notification you have to resolve your REST-KEY and DEV-KEY from console by visiting any application detail in your account.

You have to calculate hash before sending request on your back-end. Hash will be verified your identity and request. This hash should be renewed in each request. Hash is the MD5 value of concatenation of REST-KEY, DEV_KEY and ISO Formatted Date.
HTTP Request
POST https://api.xenn.io/push-notification
Header Parameters
Request headers below should be added while making request.
| Header | Name |
|---|---|
| X-Rest-Key | Your Rest Key |
| X-Hash | MD5(Your Rest Key + Your Dev Key + Now (UTC ISODateTimeFormatted Date String)) |
| Date | Now (UTC ISODateTimeFormatted Date String) Eg: 2021-05-19T19:05:00.000Z. |
Request Body Parameters
| Parameter | Type | Optional | Description |
|---|---|---|---|
| message | PushMessage | false | Push notification type message (see below for details) |
| recipient | String | false | MemberId of your logged in customer |
PushMessage
| Parameter | Type | Optional | Description |
|---|---|---|---|
| id | String | true | Push notification type message (see below for details) |
| pushType | String | false | Can be 'image' and 'text' |
| title | String | false | Title of the notification |
| subtitle | String | true | Sub title of the notification. Works in IOS only. |
| body | String | false | Message content |
| badge | Integer | true | Numeric value on the application logo |
| sound | String | true | Sound file name in your application |
| launchUrl | String | true | Deeplink or Target Url of push notification |
| imageUrl | String | true | Absolute path of the image which you would like to show. Use CDN and check image specifications. |
| extra | PlatformExtra | false | Extra parameters for specific purposes like analytics, deeplinks, etc. See below for details |
PlatformExtra
Push extra is useful when you would like to reach some parameters regarding push notification.
If you would like to track traffic from other analytics applications you can use UTM codes with adding to each platform parameter. 'utm_source', 'utm_medium', 'utm_campaign'
| Parameter | Type | Optional | Description |
|---|---|---|---|
| fcmAppPush | Map[String, String] | true | Android push notification parameters. |
| iosAppPush | Map[String, String] | true | IOS push notification parameters. |
| fcmWebPush | Map[String, String] | true | Chrome based browsers push notification parameters. |
Request Sample
curl --location --request POST 'https://api.xenn.io/push-notification' \
--header 'X-Rest-Key: XENN-RESTKEY' \
--header 'X-Hash: 1eb7122bb76d48d57bb3157b54e4440d' \
--header 'Date: 2021-05-19T19:05:00.000Z' \
--header 'Content-Type: application/json' \
--data-raw '{
    "memberId": "LOGGED_IN_CUSTOMTER_ID",
    "message": {
        "id": "ID_OF_CAMPAIGN",
        "pushType": "image",
        "title": "Transactional Push Message Title",
        "body": "Transactional Push Message Body",
        "imageUrl": "https://CDN_IMAGE_URL",
        "badge": 3,
        "extra": {
            "fcmWebPush": {
                "url": "https://www.google.com",
                "customParameter": "customValue"
                "utm_source": "xenn",
                "utm_medium": "push_web",
                "utm_campaign": "demo"
            },
            "fcmAppPush": {
                 "url": "https://www.google.com",
                 "customParameter": "customValue"
                 "utm_source": "xenn",
                 "utm_medium": "push_android",
                 "utm_campaign": "demo"
            },
            "iosAppPush" : {
                "url": "https://www.youtapplication.com",
                "customParameter": "customValue"
                "utm_source": "xenn",
                "utm_medium": "push_ios",
                "utm_campaign": "demo"
            }
        }
    }
}'
HTTP Status Codes
| Error Code | Meaning |
|---|---|
| 204 | Request is valid and your message will be delivered all tokens regarding this membership. |
| 401 | Unauthorized -- Your Request is not validated against your header parameters. |
Feeding Members
In order to use member attributes in push messages or using your existing segments while creating audiences, you have to update your application members with using this api.
You have to calculate hash before sending request on your back-end. Hash will be verified your identity and request. This hash should be renewed in each request. Hash is the MD5 value of concatenation of REST-KEY, DEV_KEY and ISO Formatted Date.
HTTP Request
POST https://api.xenn.io/members/bulk
Header Parameters
Request headers below should be added while making request.
| Header | Name |
|---|---|
| X-Rest-Key | Your Rest Key |
| X-Hash | MD5(Your Rest Key + Your Dev Key + Now (UTC ISODateTimeFormatted Date String)) |
| Date | Now (UTC ISODateTimeFormatted Date String) Eg: 2021-05-19T19:05:00.000Z. |
Request Body Parameters
| Parameter | Type | Optional | Description |
|---|---|---|---|
| updates | List[Member] | false | Member Type type message (see below for details) |
Member
| Parameter | Type | Optional | Description |
|---|---|---|---|
| id | String | false | Member id |
| name | String | true | Name |
| surname | String | true | Surname |
| String | true | Email address | |
| birthDate | DateTime | true | UTC ISODateTimeFormatted Date String) Eg: 2021-05-19T19:05:00.000Z. |
| registerDate | DateTime | false | UTC ISODateTimeFormatted Date String) Eg: 2021-05-19T19:05:00.000Z. |
| gender | String | true | Gender |
| phoneNumber | String | true | Phone number |
| segments | String | true | Internal segments. If you have more than one segments seperate them using '#'. Eg: Gold#Elite#FreeCargo |
Request Sample
curl --location --request POST 'https://api.xenn.io/members/bulk' \
--header 'X-Rest-Key: XENN-RESTKEY' \
--header 'X-Hash: 1eb7122bb76d48d57bb3157b54e4440d' \
--header 'Date: 2021-05-19T19:05:00.000Z' \
--header 'Content-Type: application/json' \
--data-raw '{
                "updates": [
                    {
                        "id": "12312",
                        "name": "paul",
                        "surname": "stanley",
                        "segments": "Gold#FreeCargo#TestUsers",
                        "registerDate": "2021-05-19T19:05:00.000Z"
                    },
                    {
                        "id": "12312",
                        "name": "paul",
                        "surname": "gilbert",
                        "segments": "ProdUsers#LikelyChurn",
                        "registerDate": "2021-05-19T19:05:00.000Z"
                    }
                ]
            }'
HTTP Status Codes
| Error Code | Meaning |
|---|---|
| 200 | Request is valid and members will be updated eventually |
| 401 | Unauthorized -- Your Request is not validated against your header parameters. |